paul vidal - thoughts about tech and more

Yearly Archives

4 Articles

We need ethics of data as much as we need ethics of AI

by paul 0 Comments
We need ethics of data as much as we need ethics of AI

I am always humbled and grateful by the persons I get to work with. I often find myself amazed (in the real sense of the term) and inspired by the intellectual journey of the people I encounter in the world of data. The data industry is at the forefront of human advancement: self driving cars, social networks, rocket launches, cyber attack prevention, medicine advancements, genomics… all fueled by data.

As technology advances, society advances and with it our code of ethics or what is considered morally good. A great example of that is applying modern standards of ethics to a generation or two before us. I’m sure we all had uncomfortable conversations with grand-parents.

Recently, one of the most mind boggling problem of ethics surrounds machine learning and artificial intelligence. Whether it is responding to sci-fi skynet-like ideas of artificial consciousness, or more down to earth considerations such as yet another iteration of a trolley problem substituting the subject with a self driving car, you will see write-ups popping up everywhere (often by people that don’t know much about the field). Of course, this work is important, and if you want to read a good book about this, here is the reference: Ethics and Data Science, by DJ Patil, Hilary Mason, Mike Loukides.

You do not need data science to think about ethics

Here is the core of my argument: you do not need data science to think about ethics. Ethics should be part of every piece of software brought to the public, especially when dealing with data.

Growing up, I was inspirited by Google’s modo: “Don’t be evil”, which later changed to “Do the right thing” (see wikipedia). Unfortunately, a few years later, I feel a different code of conduct coming from certain software companies, especially those who are at the center of our lives like social media.

Facebook is an example that comes very easily to mind, with recent scandals such as the Cambridge Analytica scandal. For those who need more that a moral reason of why that type of scandal is bad, look at the recent news and the exec that are leaving Facebook. Not considering ethics is just bad for business. Read the Power Paradox to get a bit more context.

Not considering ethics is just bad for business.

Now, I’m not an idealist that thinks that Facebook will give such a great service to the world without trying to monetize it. So much so that I was brought up with the idea of: if you don’t want something to be known, you should not put it on the internet. Here is the problem though: as our society evolves, this motto will be impossible to follow. Your personal data will be available on the next generation of quantum ai driven global network, or whichever buzz wordy combination makes you think of the future of technology.

This is why it is important to consider ethics now.

For software companies, it means enabling your customer to evaluate your ethics. I think that it would be done following these 3 pillars:

  • Transparency: If a social network comes to me and says: look, we are going to use your data to target adds at you, but we will never leak it to organizations promoting political campaigns and you get to see exactly which data is given to whom, I’m in! This is true for social medias, but for cloud, Software as a Service as well. If I am a small business and I subscribe to a payment processing engine, I want to know how you are using my sales data.
  • Openness: Software companies should not only tell us who uses our data, you should tell us what type of algorithms you use to create your software (not necessarily opening the code, but at least an idea of the architecture)
  • Accountability: Finally, if a company makes a mistake, own it and communicate it to the public. This seems obvious to me but apparently not common practice

For users, we need to vote with our decisions. I want companies to consider ethics to be an equally important consideration as customer satisfaction for instance, though I believe that in the long run, both are closely related. This is why I stopped using certain social networks, and I spent my days fighting against bad practices in the world of large enterprises software.

I realize defining and observing a code of ethics is difficult and that it is a moving target. Nevertheless, I feel that the software industry engine, and its oil that is data does not have the appropriate ethics institutions in place. I’d like for this to change.

Science tweets sentiment analysis: using Stanford CoreNLP to train Google AutoML

by paul 0 Comments

I have been wanting to play with Google AutoML tools, so I decided to do a quick article on how to use the Stanford CoreNLP library to train Google Auto ML. I took a simple example of parsing tweets talking about science and passing them through the two libraries. Here is a summary of this work.

Note: All content of the work can be found on my GitHub, here: https://github.com/paulvid/corenlp-to-auto-ml

Getting Data

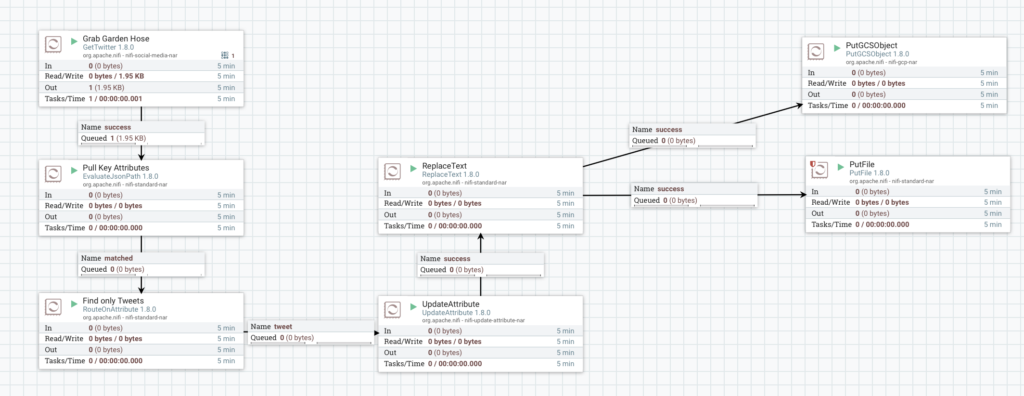
Getting data is easy with Nifi. I created a flow that grabs from the Science Filter Endpoint as depicted below:

As you can see, I then use PutGCSObject and PutFile to put the tweet messages respectively on my computer and on a GCS bucket (for historical purposes).

Running CoreNLP with Python

To run core NLP you will need to:

The super simple code I used below creates two type of files for our AutoML data set:

  • A new file for each sentence in a tweet
  • A list csv file containing the name of file above as well as the sentiment value of the sentence
# Import Libraries
from stanfordcorenlp import StanfordCoreNLP
import json
import os
import re

nlp = StanfordCoreNLP(r'/Users/paulvidal/Documents/Nerd/NLP/stanford-corenlp-full-2018-10-05')

# Init variables
veryNegativeResults = 0
negativeResults = 0
neutralResults = 0
positiveResults = 0
veryPositiveResults = 0
invalidResults = 0

# Loop trough files and get the tweet

rootdir = '/Users/paulvidal/Documents/Nerd/NLP/tweets'
outputDirectory = '/Users/paulvidal/Documents/Nerd/NLP/results'
csvF = open(os.path.join(outputDirectory, 'list.csv'), "w+")
sentenceNumber = 1

for subdir, dirs, files in os.walk(rootdir):
for file in files:
f = open(os.path.join(subdir, file))
rawTweet = f.read()
for k in rawTweet.split("\n"):
sentence = re.sub(r"[^a-zA-Z0-9]+", ' ', k)
# print sentence
# Sentiment
jsonSentiment = json.loads(nlp.annotate(sentence,
properties={
'annotators': 'sentiment',
'outputFormat': 'json'
}))

currentSentence = ''
for s in jsonSentiment["sentences"]:
for y in s["tokens"]:
currentSentence = currentSentence + ' ' + y["originalText"]
if(s["sentiment"] == "Verynegative"):
veryNegativeResults = veryNegativeResults + 1
elif(s["sentiment"] == "Negative"):
negativeResults = negativeResults + 1
elif(s["sentiment"] == "Neutral"):
neutralResults = neutralResults + 1
elif(s["sentiment"] == "Positive"):
positiveResults = positiveResults + 1
elif(s["sentiment"] == "Verypositive"):
veryPositiveResults = veryPositiveResults + 1
else:
invalidResults = invalidResults + 1
currentFilename = open(os.path.join(outputDirectory, 'analyzed-sentence-' + str(sentenceNumber) + '.txt'), "w+")
currentFilename.write(currentSentence)
currentFilename.close()

csvF.write('analyzed-sentence-' + str(sentenceNumber) + '.txt' + ',' + s["sentiment"] + '\n')
sentenceNumber = sentenceNumber + 1

f.close()
csvF.close()


print "Very Negative Results:", veryNegativeResults
print "Negative Results:", negativeResults
print "Neutral Results:", neutralResults
print "Positive Results:", positiveResults
print "Very Positive Results:", veryPositiveResults
print "Invalid Results:", invalidResults
nlp.close()
# Do not forget to close! The backend server will consume a lot memory.

Running through about 1300 tweets, here are the results I get per sentence:

 Very Negative Results: 3
Negative Results: 1019
Neutral Results: 638
Positive Results: 110
Very Positive Results: 1
Invalid Results: 0

Using the data set to train Google AutoML

Step 0: Create a project and add AutoML Natural Language to it.

This should be fairly straight forward, a lot of documentation out there, so I’m not going to spend time on this. Refer to the google cloud tutorials, they are easy to follow.

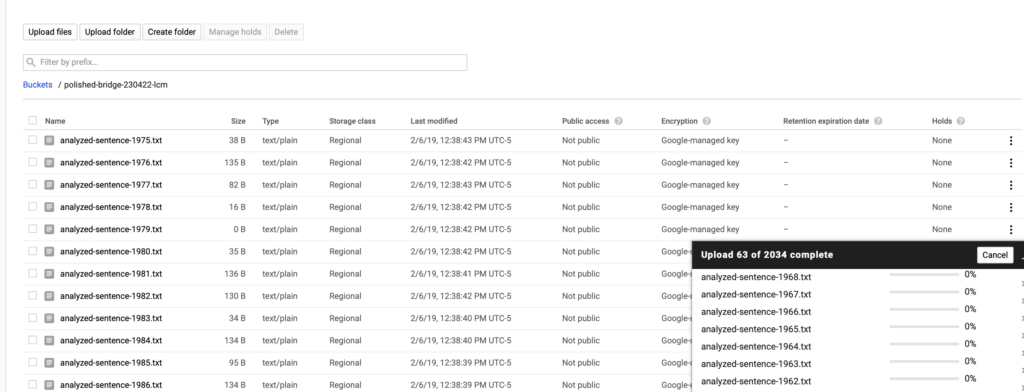
Step 1: Upload the output of your python program to your AutoML bucket

Using the storage interface or the gsutils command line, upload all the files you created and the list.csv as depicted below:

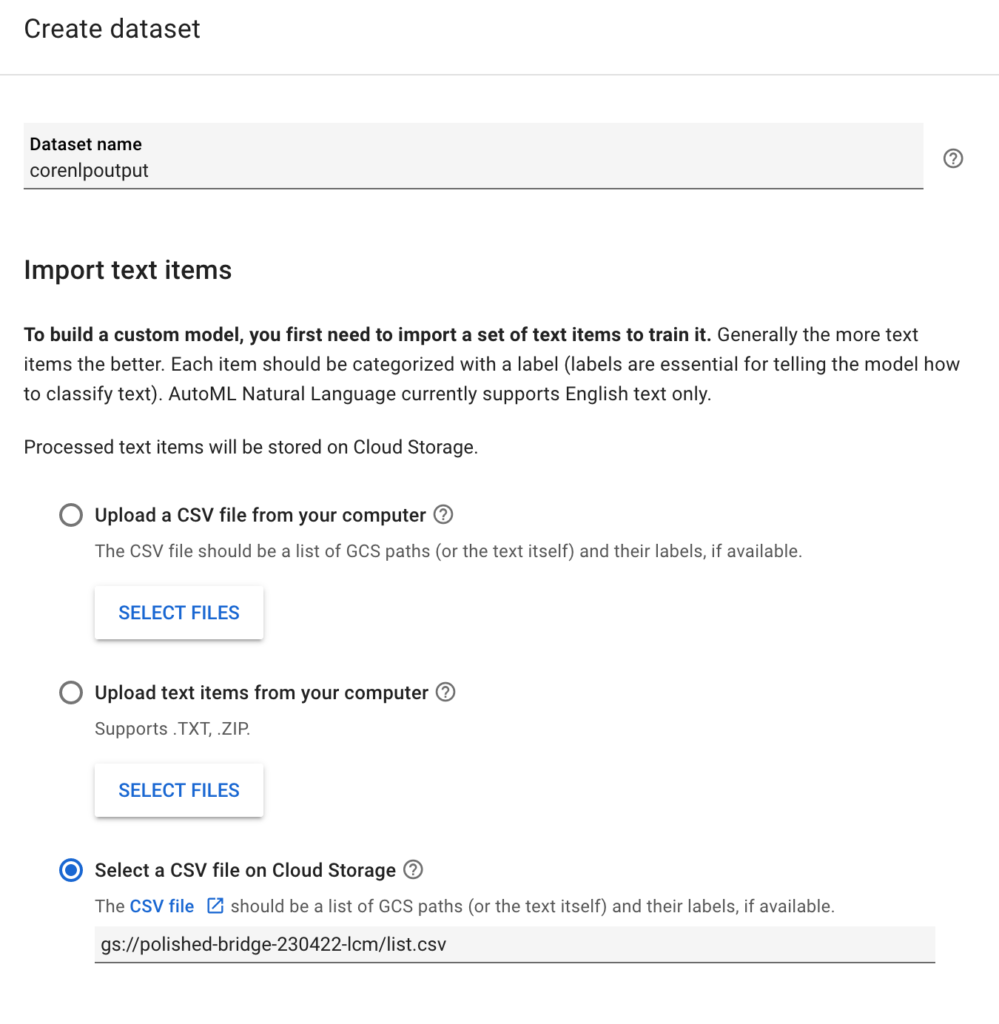
Step 2: Add a data set to your AutoML

Create a data set using the list.csv you just uploaded:

Step 3: Train Model

The data set will upload and you should see your sentences labeled according to the coreNLP classification.

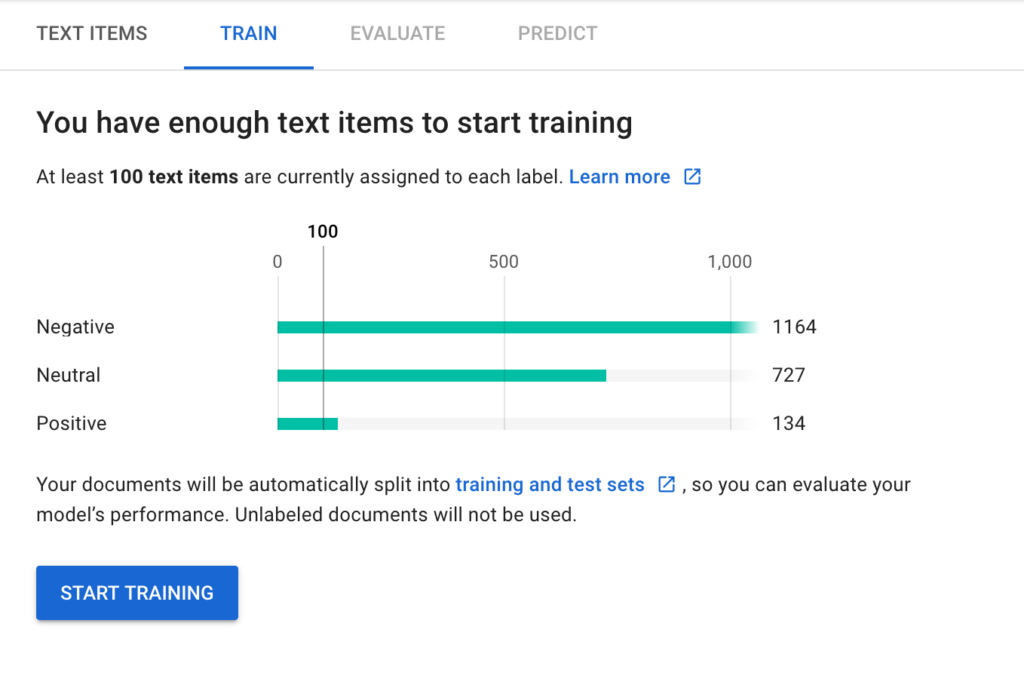
Note that you will have to most likely remove the label from verynegativs or verypositive labels as there might be less than 10 items in it.

You can now use the AutoML interface to train your model:

Pretty straight forward all considered. I haven’t run the training model yet as I need to think of compute costs, but this is pretty cool!

True cloud automation for large organizations: a case of leading by example.

by paul 0 Comments
True cloud automation for large organizations: a case of leading by example.
If you're reading this Ashish, this is for you

Introduction

As a solution engineer, it is my mandate to advocate large IT organizations on how to best leverage the tools available in the market to empower their users to be autonomous. In the world of big data, this has many aspects from defining business processes to ensuring security and governance. The key aspect however is the ability to “shift to the left”, meaning that the end user is in control of the infrastructure necessary for his job.

Ultimately this is the unicorn every organization wants: a highly guarded infrastructure that feels like a plain of freedom to the end user.

Some organizations choose to use one vendor (e.g. cloud vendor) to implement this unicorn vision, but soon realize (or will soon) that the limiting yourself to one vendor not only restrict the plain field of end users it paradoxically make the implementation of consistent governance and security harder (because of vendor limitations and a tendency towards restricting cross platform compatibility)

The solution is what I advice my customer every day: building the backbone of an organization on open inter compatible standards that allow growth while maintaining consistency. In today’s world, it’s the hybrid cloud approach.

When I joined Hortonworks (now Cloudera) a few months ago I was impressed by the work done by a few Solution Engineers (Dan Chaffelson and Vadim Vaks). They had built an automation tool that would allow any Solution Engineer in the organization to spin their own demo cluster and load whatever demo they want called Whoville. I led a Pre-Sales organization before: this is the dream. Having consistency over demos for each member of the organization while empowering the herd of cats that Solution Engineers are is no easy feat. Not only that, we were eating our own dog food, leveraging our tools to instantiate what we had been preaching!

I’m still in awe of the intelligence and competency of the team I just joined. But, being as lazy as I am, I decided to try and build an even easier button for Whoville which would:
1. Empower the rest of our organization even more
2. Show true thought leadership to our customers

So with the help of my good friend Josiah Goodson and the support of the Solution Engineering team (allowing us to work on this during a hackathon for instabce) we built Cloudbreak Cuisine.

Introducing Cloudbreak Cuisine

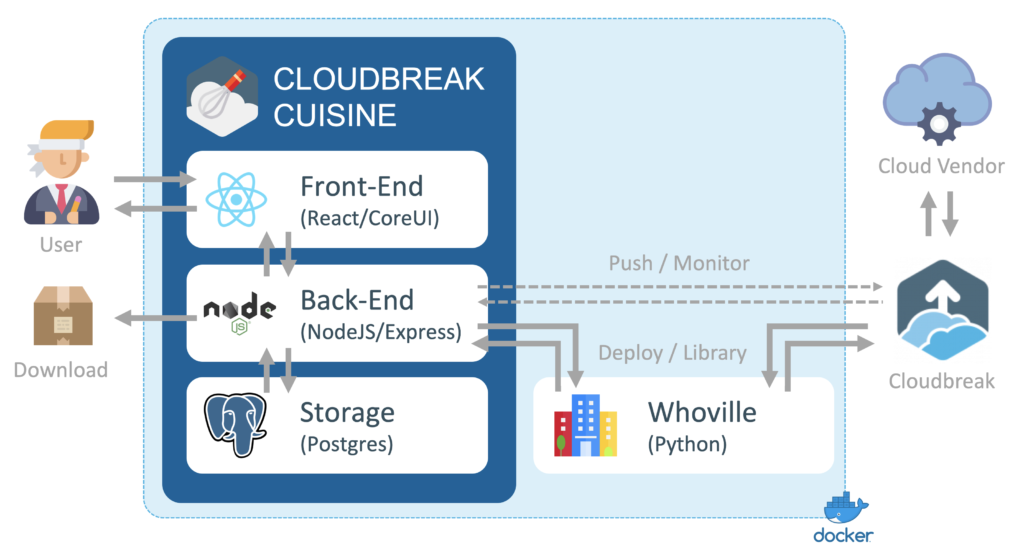
Cuisine is fully featured application, running in containers, that allows, in its alpha version, Solution Engineers to:
1. Get access to Whoville library, deploy and delete demo clusters
2. Monitor clusters deployment via Cloudbreak API
3. Create your own combination of Cloudbreak Blueprints & Recipes (a.k.a. bundles) for your own demo
4. Push those bundles to Cloudbreak

Below is a high level architecture of Cuisine:

Cloudbreak Cuisine Architecture

The deployment of the tool is automated, but requires access to Whoville (restricted within our own organization). All details can be found here: https://github.com/josiahg/cloudbreak-cuisine

The couple of videos below showcase what Cuisine can do, in its alpha version.

Glossary: Cuisine Bundles are a combination of Cloudbreak Blueprints & Recipes.

Features

Push a bundle from Whoville

Push Bundle

Delete a Bundle via Cloudbreak

Delete Bundle

Add Custom Recipe

Add Recipe

Create Custom Bundle

Create Bundle

Download/Push Bundle

Download/Push Bundle

Additional tips/tricks

Tips & Tricks

Parting thoughts

First and foremost: thank you. Thank you Dan and Vadim for Whoville, thank you Josiah for your continuous help and thank you Hortonworks/Cloudera to allow us to be demonstrating such thought leadership.

Secondly, if you’re a Cloudera Solution Engineer, test it and let me know what you think!

Finally, for every other reader out there: this is what an open platform can do to your organization. Truly allow you to leverage any piece of data or any infrastructure available to you; from EDGE to AI :)

Use Altus Director to launch a Cloudera Data Science Workbench cluster on AWS

by paul 0 Comments
Use Altus Director to launch a Cloudera Data Science Workbench cluster on AWS

My blood recently turned from green to blue (after the Hortonworks-Cloudera merger) and I couldn’t be more excited to play with new toys. What I am particularly excited about is Cloudera Data Science Workbench. But, like in everything I do, I am very lazy. So here is a quick tutorial to install Altus Director, and use it to deploy a CDH 5.15 + CDSW cluster.

Step 1: Install Altus Director

Many ways to do that, but the one I chose was the AWS install, detailed here: https://www.cloudera.com/documentation/director/latest/topics/director_aws_setup_client.html

The installation documentation is very well done, but here are the important excerpts

Create a VPC for your Altus instance

Follow the documentation.

Few important points:

  • In the name of laziness I also recommend to add a 0-65535 rule from your personal IP.
  • Your VPC should have an internet gateway associated with it (you could do it without, but would require you manually pulling the CM/CDH software down and make internal repositories within your subnet)
  • Do not forget to open all traffic to your security group as described here. Your deployment will not work otherwise.

Launch a Redhat 7.3 instance

You can either search communities AMIs, or use this one: ami-6871a115

Install Altus

Connect to your ec2 instance:

ssh -i your_file.pem ec2-user@your_instance_ip

Install JDK and wget

sudo yum install java-1.8.0-openjdk
sudo yum install wget

Install/Start Altus server and client:

cd /etc/yum.repos.d/
sudo wget "http://archive.cloudera.com/director6/6.1/redhat7/cloudera-director.repo"
sudo yum install cloudera-director-server cloudera-director-client
sudo service cloudera-director-server start
sudo systemctl disable firewalld
sudo systemctl stop firewalld

Connect to Altus Director

Go to http://your_instance_ip:7189/ and connect with admin/admin

Step 2: Modify the Director configuration file

CDSW cluster configuration can be found here https://github.com/cloudera/director-scripts/blob/master/configs/aws.cdsw.conf

Modify the configuration file to use:

  • Your AWS accessKeyId/secretAccessKey
  • Your AWS region
  • Your AWS subnetId (same as the one you created for your Director instance)
  • Your AWS securityGroupsIds (same as the one you created for your Director instance)
  • Your private key path (e.g. /home/ec2-user/field.pem)
  • Your AWS image (e.g. ami-6871a115)

Step 3: Launch the cluster via director client

Go to your EC2 instance where Director is installed, and load your modified configuration file as well as the appropriate key.

Finally, run the following:

cloudera-director bootstrap-remote your_configuration_file.conf \
--lp.remote.username=admin \
--lp.remote.password=admin

Step 4: Access Cloudera Manager

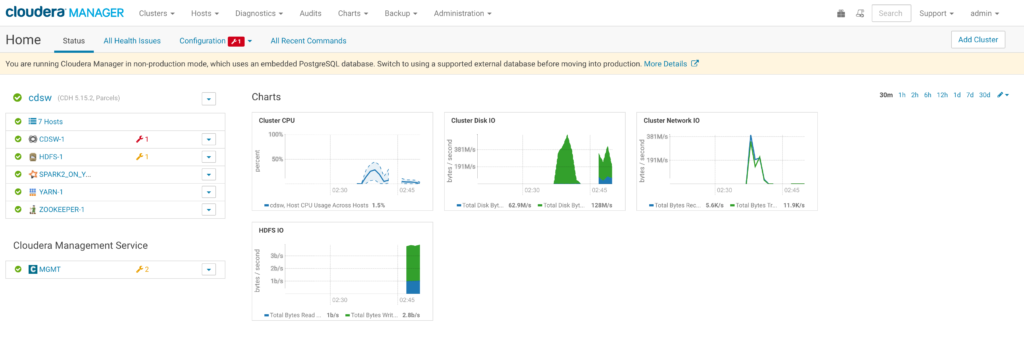
You can follow the bootstrapping of the cluster both on command line or in the Director interface; once done, you can connect to Cloudera Manager using: http://your_manager_instance_ip:7180/

Step 5: Configure CDSW domain with your IP

Cloudera Data Science Workbench uses DNS. The correct approach is to setup a wildcard DNS record is required, as described here.

However, for testing purposes I used nip.io. The only parameter to change is the Cloudera Data Science Workbench Domain, from cdsw.my-domain.com as the conf file sets it up to, to cdsw.[YOUR_AWS_PUBLIC_IP].nip.io, as depicted below:

Restart the CDSW service, then you should be able to access CDSW by clicking on the CDSW Web UI link. Register for a new account and you will have access to CDSW: